Resource Search (Resource Manager)
Resource item records identify your physical items and include information about a specific resource, such as serial number, barcode and brand.
Search for Resources
- Select Catalog > Resource Search > Search sub-tab.
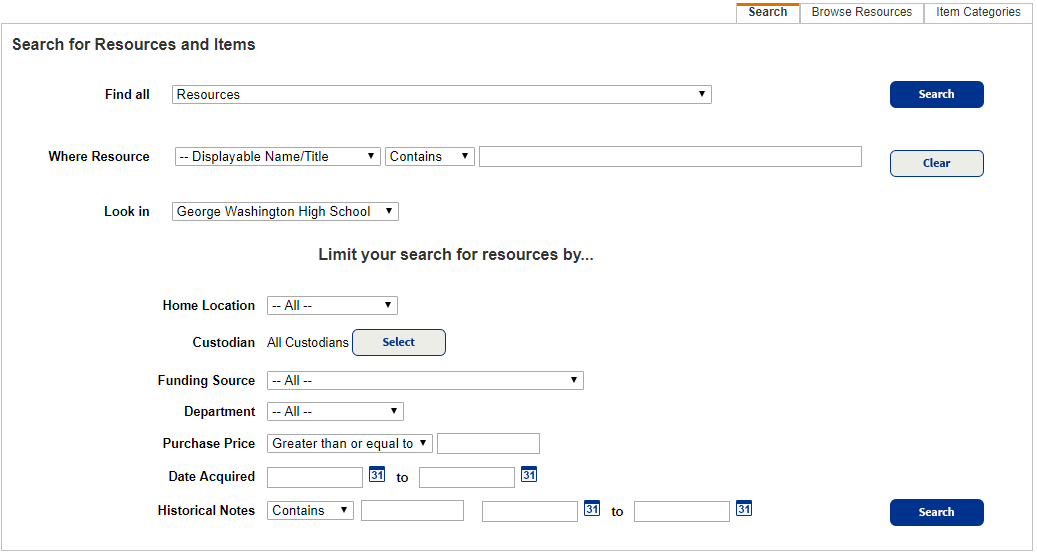
- From the Find all drop-down, select a resource template.
Notes:
The template you select determines your available search and Sort By options.
- The Textbooks template offers additional fields and options. If you select Textbooks from the Find all drop-down, Follett recommends you select ISBN from the Where Resource drop-down.
- If you have Resource Manager – Asset Edition, you will not see the Textbooks template.
- If your district has resource groups set up, you might not see the Textbooks template.
Important: If a district has any Destiny Textbook Manager installations, all textbook-related features are hidden in Resource Manager.
- From the Where Resource drop-down, select a search option.
Notes:
If you select an item, the exact value is required, and the results show resources and items.
If you select a resource, the results only display resources.
If you select a displayable name, you can use wildcards for the Contains and Starts with search options. Wildcards must contain at least one character, then an asterisk (*).
- If you search for a component, use a keyword search.
- Use the second Where Resource drop-down to select one of the following:
- Starts With: Searches for resources that begin with the letters or words you type. Select this option only when you know the resource’s exact name.
- Contains: Performs a keyword search for one or more words that are part of the Resource Displayable Name. This is the broadest search.
- Enter your search term.
Notes:
-
If your search term includes words separated by a punctuation mark, eliminate it. Destiny ignores punctuation.
Example: If your search term is audio-visual, type "audiovisual" (eliminate the dash).
- Destiny stop words are used in Contains searches. Stop words are words that Destiny ignores for a more efficient search. For a list of Destiny's stop words, see Resources search.
You can use Boolean operators for the Contains search option. Boolean operators define the relationship between the words or phrases in your search term:
AND narrows a search, showing fewer results.
NOT narrows a search, showing fewer results.
OR expands a search, showing more results.
Boolean operators must be upper case.
-
If your search term includes words separated by a punctuation mark, eliminate it. Destiny ignores punctuation.
- Use the Look in drop-down to select where you want to search.
- Under Limit your search for resources by..., select any other limiters you want to use.
- Click Search.
- Find the resource you want, and then click Details.
- To continue, see Resource Details, Items / Media or Supplements.
Note: In Resource Manager, you can only access the resources you have permission to view. For details, see Resource Groups.
Duplicate Barcodes
If you search across the district and there are duplicate barcodes, they appear in the search results.
When searching by barcode, whether from the district or across the district from a site, it is possible that search results will contain duplicate barcodes. If so, be sure to select the resource you want.
If you search or scan for a resource by barcode, duplicate barcodes could be found at sites other than your own. You are given the option to either not transfer or choose the appropriate resource to transfer.
In-Hand Transfer
An in-hand transfer is when an item from another site in your district is scanned at your site, and then transferred to your site.
|
Notes:
|
Example: An item in your district is scanned at your site, but it is currently assigned to another site in the district.
- If in-hand transfers are allowed, the system displays an in-hand transfer message.
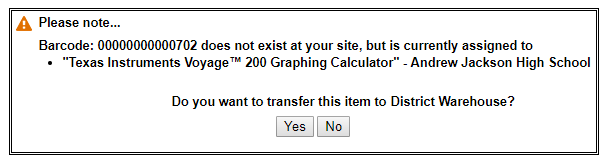
- If the item already has a status, such as checked out, selecting Yes to the in-hand transfer message resolves any previous statuses.