Manage Shipments (Site)
Site users can use the View Shipments page to add or view notes about shipments, or start receiving items from a shipment.
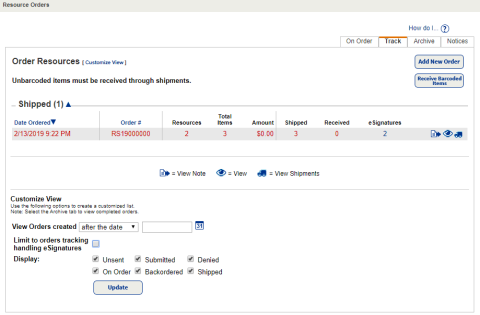
Select Catalog > Resource Orders > Track, or click![]() .
.
Add or View Notes
To see a note on the order, click ![]() . For steps to add or view a note, see Add or View Note.
. For steps to add or view a note, see Add or View Note.
| Note: You can only add eSignatures notes with the Follett Destiny® VersaScan or the Destiny Back Office app. |
Receive Items from a Shipment
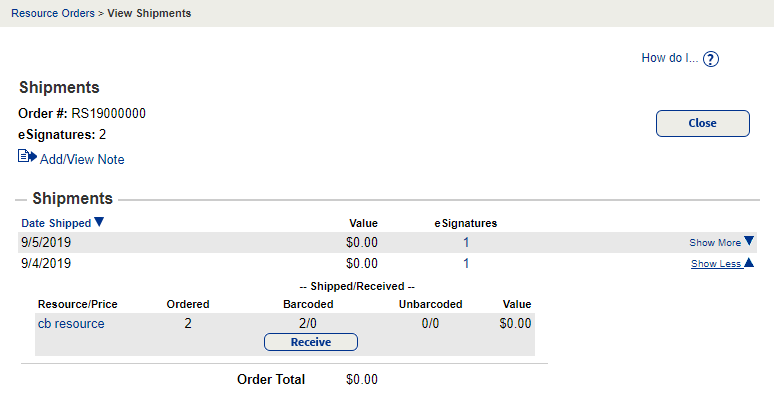
- Next to the shipment, click
 .
.
The View Shipments page appears.
- In the shipment row, click Show More.
-
View Resource Details
To view details about a resource item in the order, click the name of the item.
Note: On some pages, you must click Show More to see a clickable link for the resource item.
The Resource Details page for the item of interest appears.
Under the Shipped/Received column, click Receive. A new page appears. - To assign a Custodian, Home Location or Department to the items you receive, click Assign To. The Assign Values page appears. See Assign Values to Resource Items.
- Find the item you want to receive, and then click Receive.
- For barcoded items, the View Shipment page appears. See Receive a Shipment of Barcoded Items.
- For unbarcoded items, the Receive Items page appears. See Receive a Shipment of Unbarcoded Items.
Note: If the shipment includes Track handling eSignatures for this transfer, but no eSignatures were provided during shipping, then the Site Administrator receives an email. The email indicates no eSignatures were entered before the resource order was completed.