Update Patrons Individually
When you want to update one or more fields in one or a few patron records, users with Update Patrons permission can use the Update Patrons page. You can change or clear up to three fields at once for individual patrons.
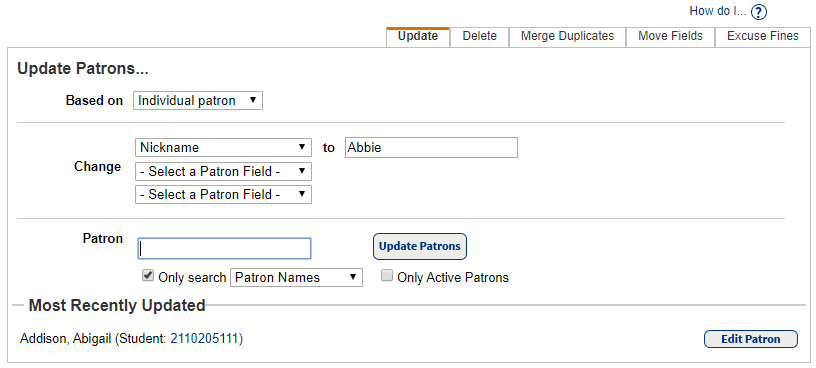
To update a patron individually:
- Select Admin > Update Patrons > Update sub-tab.
- Use the following table to fill in the fields:
Field Description Based on Select Individual Patron. Change - Use the Change drop-down to select a field to update:
- Patron Type
- Any User Defined field
- Graduation Year
- Grade Level
- Homeroom
- Card Expiration Date
- Currently Teaching Status (in Resource Manager and Textbook Manager)
- Patron Status
- Access Level (if you are an Administrator)
Note: If you select Access Level, you can change the Access Level and the Resource Group.
- Enter or select the new contents in the to field that appears.
- To clear a field, leave the to field empty.
- To update a second or third field, repeat.
If you are updating only one field, from the second drop-down, leave -Select a Patron Field-.
Patron
- To speed the search, select the Only search checkbox, and select the field from the drop-down.
As Destiny processes the record, the patron's name, patron type and barcode number appear under the Most Recently Updated section. - To complete the task for active patrons, select the Only Active Patrons checkbox.
- Use the Change drop-down to select a field to update:
- Make sure the cursor is in the Patron field, and then scan a patron's barcode number.
Note: To verify the changes, click the barcode number or Edit Patron next to the updated patron.
- Click Update Patron.
- Continue scanning the remaining barcodes to update the information as needed.
Note: If you cannot scan a barcode, or it brings up the wrong record, you can search the database by entering a patron name (or part of a name, followed by *), Grade Level, Homeroom, User Name, User Defined field or District ID, and clicking Update Patrons. Then, select the correct patron in the resulting list.
For more on managing patrons, including free online training, webinars and educational resources, check out Follett Community.