View Copies Marked "Lost" in an Inventory (Library Manager)
The View "Lost Copies" list shows copies marked "Lost" during an inventory.
- Before finalizing your inventory, you can review the list of lost copies.
- After finalizing your inventory, you can delete all lost copies.
- If you finalized an inventory and selected Mark all unaccounted for copies "lost" on the confirmation message by mistake, you can reset those copies back to Unaccounted For.
Pre-Finalize Check of "Lost" Copies
- Select Admin > Inventory.
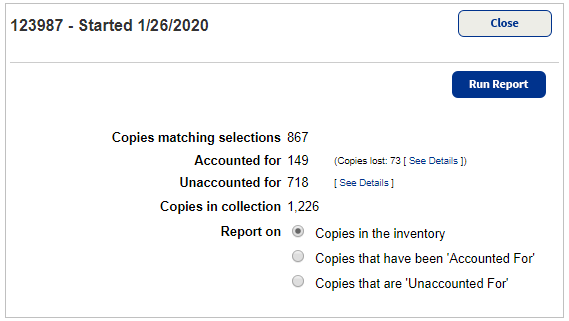
- Click See Details next to Copies lost. The View "Lost" Copies page appears.
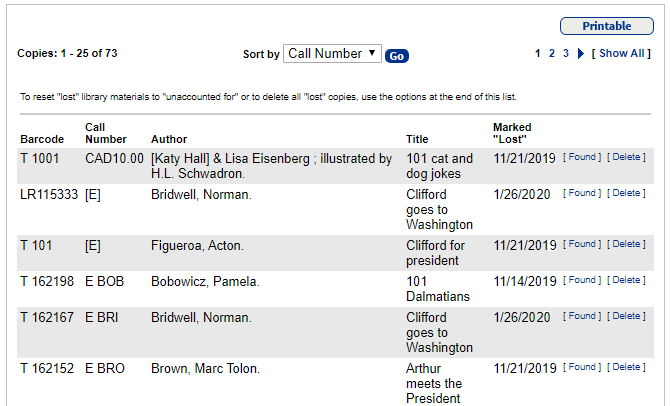
- To sort the list, select the order from the Sort by list and click Go. Click again to invert the order (ascending to descending).
- To take the list to your shelving or storage locations, click Printable for a printable page.
- If you locate a copy that was marked Lost, click Found to account for it and change its copy status to Available. You can also scan the copy or enter it on the main Inventory page.
Note: In Textbook Manager, Lost copies without barcode numbers may appear on the list. You cannot mark them as Found. - To permanently delete a lost copy from the collection, click Delete.
Reset "Lost" Copies to Unaccounted For
If you finalized an inventory and selected Mark all unaccounted for copies "lost" by mistake, you can reset the copy status to Available.
- Select Admin > Inventory.
- Click View "Lost".
- Scroll to the bottom of the list.
- Click the calendar icon next to Reset all [copies] marked "lost" on field, and select the date on which you made them lost.
- Click Reset "Lost", and then Yes on the confirmation message.
For each copy reset, the copy status changes from Lost to Available. For copies whose last seen date is earlier than the inventory start date, the inventory status also changes from Accounted For to Unaccounted For.
- Reset "Lost" only resets copies that were marked lost by Inventory.
- Reset "Lost" does not reset any copies that had been checked out and then lost by a patron (and thus, accounted for in the inventory).
Reset "Lost" skips those; they remain lost. - For Textbook Manager only:
- Reset "Lost" resets only copies that were marked Lost by Inventory and were not checked out at the time.
If you included checked-out copies in the inventory and then chose Mark all unaccounted for copies lost when finalizing, Reset "Lost" cannot reset those copies back to Checked Out; they remain Lost. - Reset "Lost" does not reset copies without barcode numbers; they remain Lost.
To make these copies Available, retrieve the title in the Catalog, and then click Found on the Copies tab.
- Reset "Lost" resets only copies that were marked Lost by Inventory and were not checked out at the time.
Delete All "Lost" Copies
You can delete the copies that were marked lost on or before a particular date.
- Select Admin > Inventory. Scroll to the bottom of the list.
- Click View "Lost".
- Scroll to the bottom of the list.
- Click the calendar icon next to Delete all copies marked "lost" on or before, and select the date on which you made them lost.
- Click Delete All, and then Yes on the confirmation message.
- Delete All deletes copies that have been checked out and then lost by patrons, as well as copies that were marked lost by Inventory.
- You may want to keep a list of these lost copies. Before deleting them, you can save or print out the Lost Copies list by clicking Printable and using your browser.
- For more information on the lost copies (who lost them and whether there is an outstanding fine), generate a Title & Copy List, limiting the report to Show Titles With "lost" copies.
- Copies deleted here are included in the Weeding Log that you can generate in Reports.
- Delete All deletes copies that have been checked out and then lost by patrons, as well as copies that were marked lost by Inventory.