Track and Receive Resource Transfers (Resource Manager)
Destiny Resource Manager lets you track resources loaned or reassigned to other schools in your district. The tracking and receiving functionality – combined with notification features – helps you manage your school’s valuable resources.
Track a Transfer
- Select Catalog > Transfer Resources > Track sub-tab.
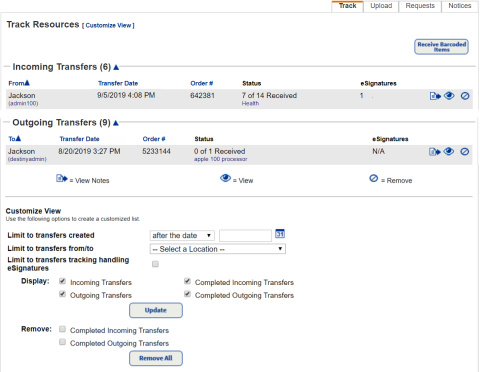
- In the Customize View section at the bottom of the page, select from the following options:
- To view transfers that occurred after, on or before a specific date, choose an option from the Limit to transfers created drop-down, and then enter a date in the next field.
- To view transfers that came from or went to a particular site, choose the site from the Limit to transfers from/to drop-down.
- To view transfers that have an eSignature, select the Limit to transfers tracking handling eSignatures checkbox.
- Choose the type of transfers to view by selecting the checkboxes in the Display section.
- Click Update.
Stop a Transfer
Until at least one item has been acknowledged as received, you can stop a transfer you uploaded.
To stop a transfer:
- Select Catalog > Transfer Resources > Track sub-tab.
- Next to the transfer to be stopped, click
 .
.
- Click Stop Transfer.
The items are returned to your collection with their previous status. The Department and Home Location are set to Undefined. If the Custodian was not associated with the receiving site at the time the transfer was initiated, the Custodian is also set as Undefined.
Receive a Transfer
You are notified of incoming transfers by the Processing Needed icon  that appears at the top of any page in Destiny.

|
Note: You must have the Transfer/Receive resource/items permission to receive transfers. |
To receive a transfer of barcoded items:
- Click
 to see a list of items needing processing, and then click View next to a Transfers message to open the Transfer Resources page.
 Note: You can also access the Transfer Resources page from Catalog > Transfer Resources > Track sub-tab.
- Next to the shipment, click .
- Click Receive.
- To assign a Custodian, Home Location or Department to the items you receive, click Assign To.
Note: For a site-to-site transfer, Destiny sets the Home Location to Undefined and retains the Custodian. If the Department is available in the school receiving the item, Destiny retains it.
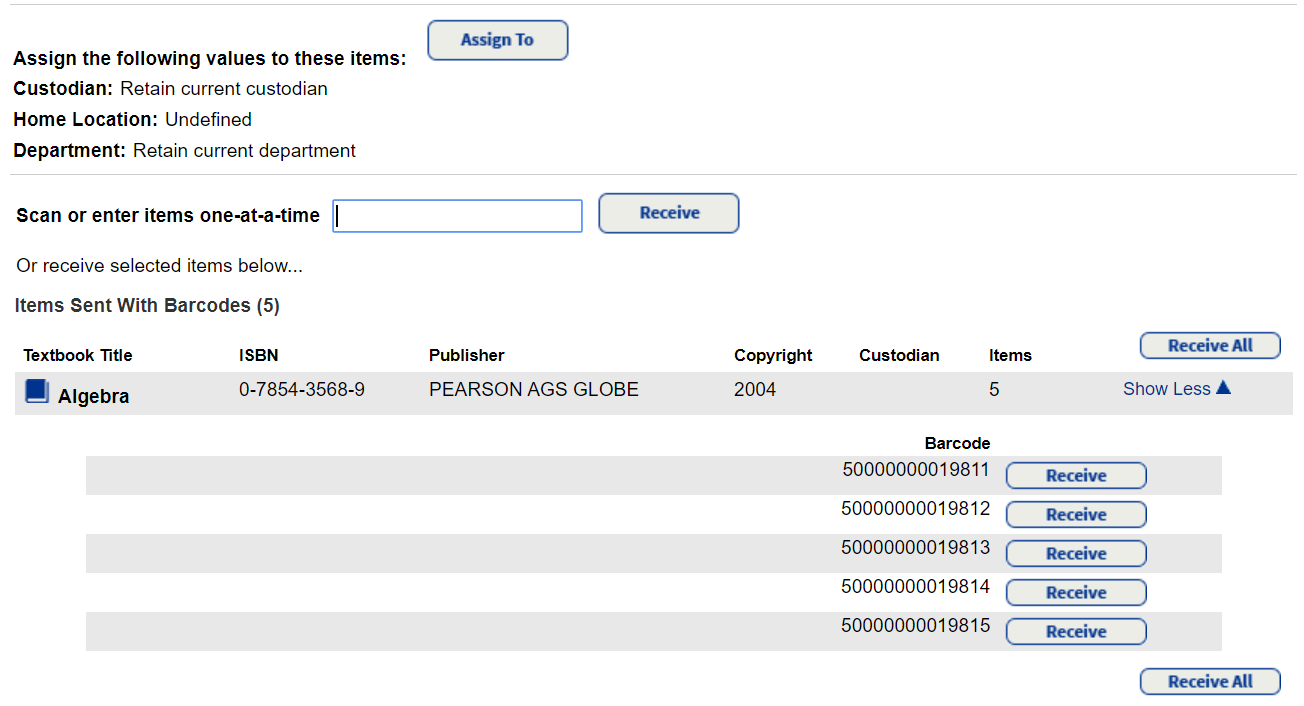
- Use one of the following methods to receive the items:
If you want to… Then… Receive the entire shipment electronically - Click Receive All. The Job Manager appears.
Note: If you choose to assign a Custodian, Home Location or Department, Destiny adds that information to all of the items. - To update the job status, click Refresh List.
- Once the status is Completed, click View to see the Job Summary.
Note: This is the only option that generates a Job Summary.
Receive individual items electronically - Click Receive next to an item.
Note: This method also lets you change the Custodian, Home Location and Department assignments for any of the items.
- To print a list of items selected to receive, click Print It.
Receive items manually - In the Scan or enter items one-at-a-time field, scan or type one barcode at a time, and then click Receive.
- To print a list of items selected to receive, click Print It.
- Click Receive All. The Job Manager appears.
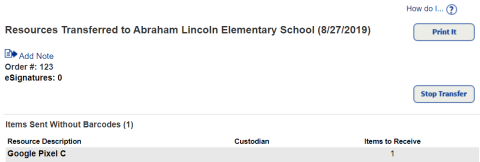
To receive a transfer of unbarcoded items:
|
Note: To do this, you need the Receive resource items without barcodes permission. |
- Select Catalog > Transfer Resources, or click and then View next to an item to open the Transfer Resources page.
- Next to the shipment, click .
- To receive the transfer, click Receive.
Note: To reroute some or all of the items to a different school, click Reroute.
- To assign a Custodian, Home Location or Department to the items you receive, click Assign To, fill in the fields, and then click OK.
Note: For a site-to-site transfer, Destiny sets the Home Location to Undefined and retains the Custodian. If the Department is available in the school receiving the item, Destiny retains it.
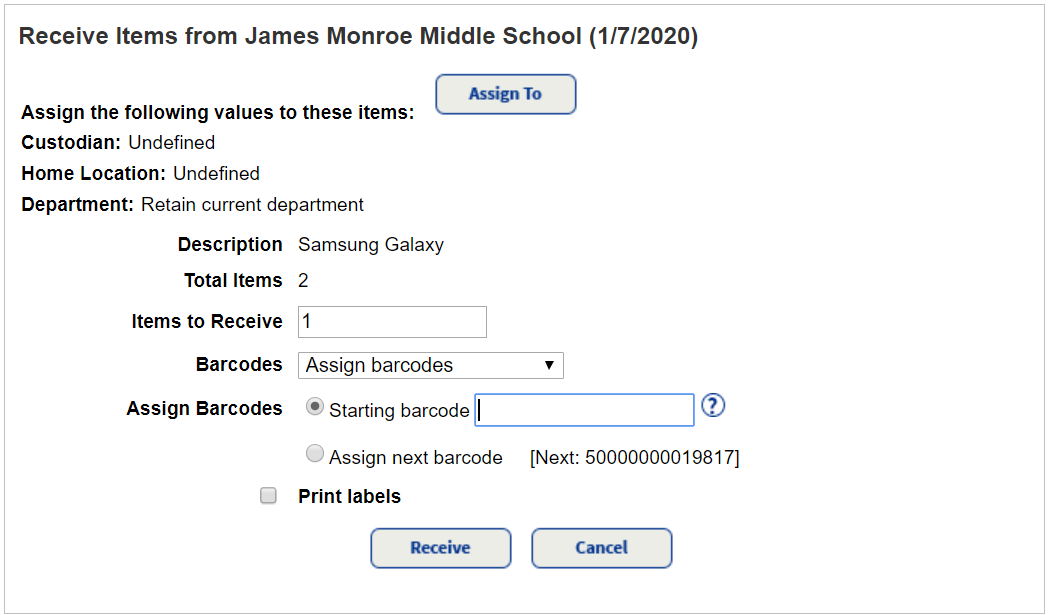
- In the Items to Receive field, type the number of items you are receiving.
- To assign barcodes to the items, use the Barcodes drop-down.
Notes:
- If duplicate barcodes are allowed across your district and the sending site had barcodes that would be duplicated at the receiving site, those items are sent as a separate transfer of unbarcoded items in Destiny. You might need to remove the barcode labels from the physical items to replace them with new ones.
- You cannot assign barcodes to items with an instructional classification of Never Barcode or Consumable.
- If you add barcodes to the items, do one of the following:
- Type the starting barcode.
- To have Resource Manager assign the next available barcodes, select Assign next barcode.
- To print barcode labels, select Print labels.
- Click Receive.
The transfer's status is completed.
Note: If the sending site selected Track handling eSignatures for this transfer but no eSignatures were provided during shipping, then the Site Administrators from both sites receive emails. The email indicates no eSignatures were entered before the transfer was completed.
Delete Transfers
You can remove transfers individually, or globally remove completed incoming and outgoing transfers. If you remove an incoming transfer before the items are received, they will be marked lost at your site. If you delete an outgoing transfer, the transfer will still appear as incoming at the receiving site.
To delete a transfer:
- Select Catalog > Transfer Resources > Track sub-tab.
- Choose one of the following:
If you want to... Then... Remove an individual transfer Next to the transfer you want to delete, click  .
.Globally remove completed incoming or outgoing transfers - In the Customize View section at the bottom of the page, select from the following options:
- To remove transfers that occurred after, on or before a specific date, choose an option from the Limit to transfers created drop-down, and then enter a date in the next field.
- To remove transfers that came from or went to a particular site, choose the site from the Limit to transfers from/to drop-down.
- Choose the type of transfers to remove by selecting from the checkboxes in the Remove section.
- Click Update.
- In the Customize View section at the bottom of the page, select from the following options: